Platform: Windows 11 | FactoryTalk View Studio Version: v16.00.00 (CPR 9 SR 16), Patch/Pack Number 4, Build 234
Overview
This guide walks through my experience setting up data logging from FactoryTalk View SE to a local SQL Server database using an ODBC connection. The goal is to log PLC or HMI tag values into a SQL table that can be queried, trended, or exported for reporting.
This process involves four main phases:
- Installing SQL Server and SQL Server Management Studio
- Creating the database and configuring login permissions
- Configuring SQL Server services
- Creating and configuring the Data Log Model in FactoryTalk View SE
Part 1: Install SQL Server and SQL Server Management Studio
SQL Server
You do not need to download SQL Server separately. The FactoryTalk View SE installation package includes a prepackaged SQL Server 2022 Express installer as a redistributable. Navigate to the following path on the machine where FTView is installed:
C:\RA\FTView\16.00.00-FTView-DVD\Redist\SQLServerEXPR_2022You will find two files in this folder. Run the batch file named SQL Server Install and follow the prompts to completion.
During installation, take note of the instance name that gets configured. You will need it later in the format SERVERNAME\INSTANCENAME.
SQL Server Management Studio (SSMS)
The SQL Server Management Studio helps you create and manage the database in an application format, as opposed to using a command shell. I prefer using the application…for many reasons which can be summed up as “ease of use.”
SSMS is not included in the redist and does need to be downloaded separately:
- SQL Server Management Studio (SSMS): https://learn.microsoft.com/en-us/sql/ssms/download-sql-server-management-studio-ssms
Install SSMS after SQL Server has finished installing.
Part 2: Create the Database in SSMS
Once SSMS is installed, open it, sign in as the system administrator (username: sa) using the password you used during installation, and connect to your local SQL Server instance.
In the Object Explorer on the left:
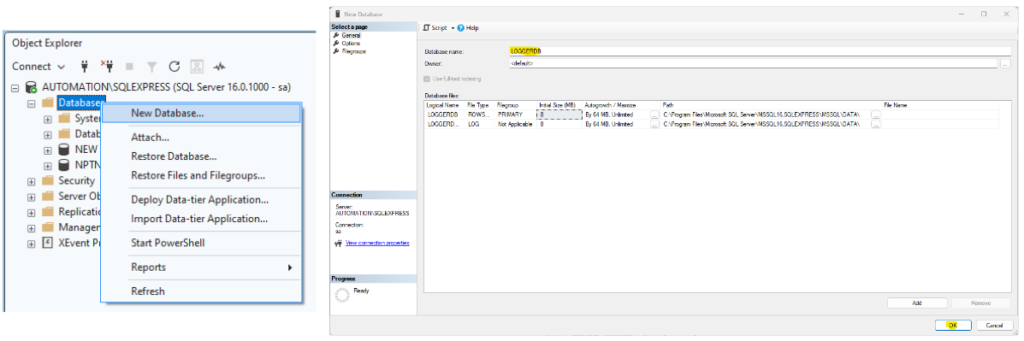
- Right-click Databases and select New Database.
- Name the database. In this guide it is called LOGGERDB.
- Click OK.
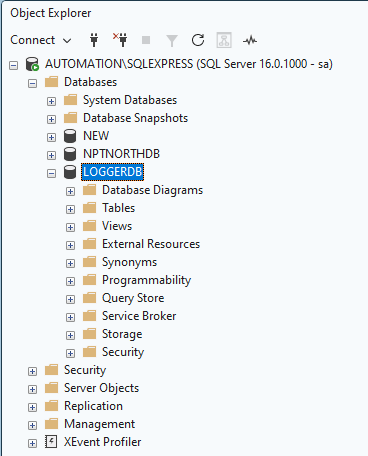
The database will appear in the Databases list once created.
Part 3: Configure Login Permissions for FactoryTalk Service Accounts
This step was critical and was only found after I couldn’t get the logging connection to work. When you test an ODBC connection manually, it connects as your Windows user and the test passes. But when FactoryTalk View SE tries to connect, it does so as a Windows service running under a service account, not your personal login. That account needs explicit SQL Server permissions.
A big thanks to Crawler009 on PLCTalk for the solution to this. The full thread is here: https://www.plctalk.net/forums/threads/factorytalk-view-se-and-odbc.109368/
In SSMS, under the Security folder in Object Explorer:
- Right-click Logins and select New Login.
- Click Search, type
LOCAL SERVICE, and click OK. - With that login selected, go to the Server Roles page and check sysadmin. Click OK.
- Right-click Logins again and select New Login.
- Click Search, type
SERVICE, and click OK. - Again, go to Server Roles and check sysadmin. Click OK.
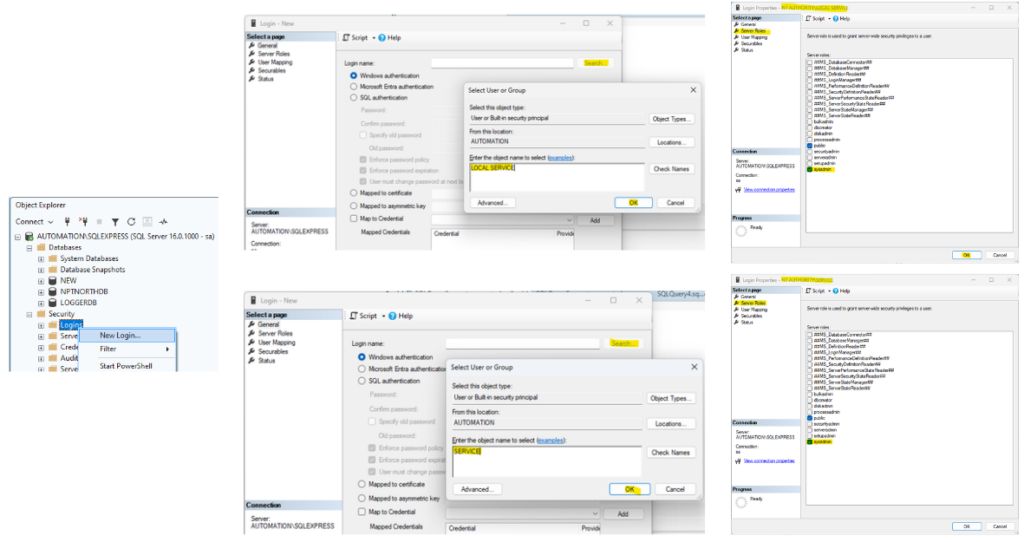
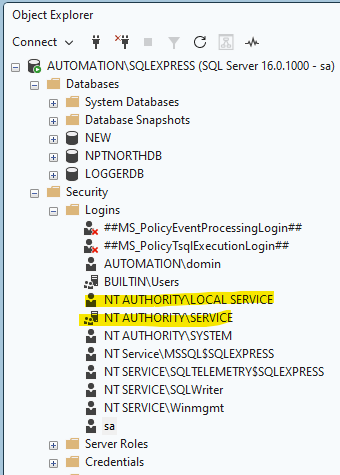
You should now have two new logins:
NT AUTHORITY\LOCAL SERVICENT AUTHORITY\SERVICE
Both need the sysadmin server role so that FactoryTalk’s background services have the access level required to write data.
Part 4: Configure SQL Server Services
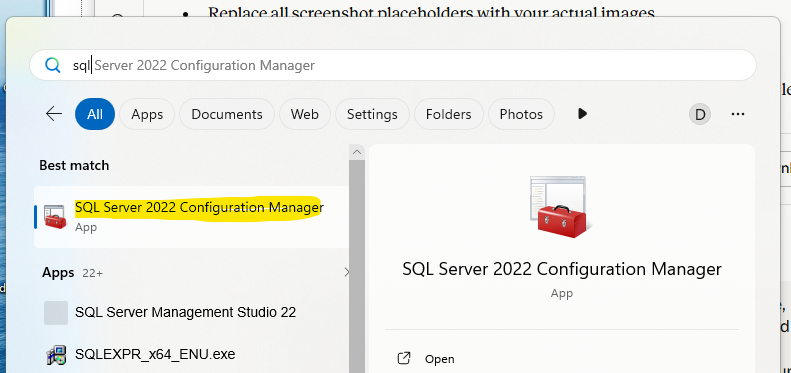
Open SQL Server Configuration Manager. You can find it by searching in the Start menu.
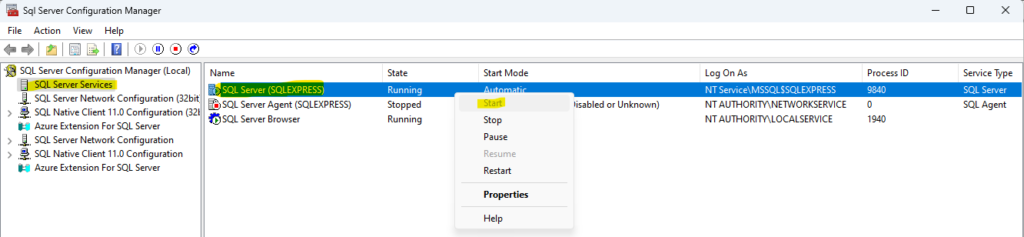
Under SQL Server Services, verify the following:
SQL Server (your instance name)
- Status should be Running. If it is not, right-click and select Start.
SQL Server Browser
- By default this is often set to Disabled, which will prevent ODBC from resolving the instance name over the network.
- Right-click SQL Server Browser, go to Properties, and set Start Mode to Automatic.
- Then right-click it again and select Start.
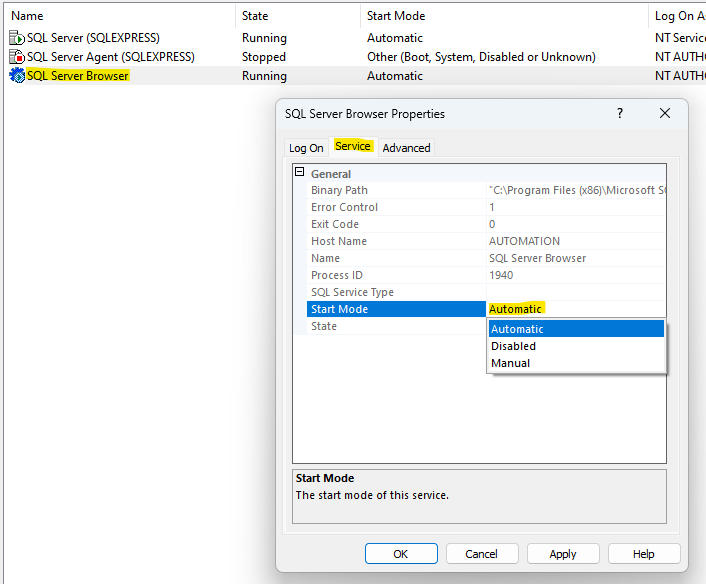
The SQL Server Browser service is what allows ODBC to resolve a named SQL Server instance (the SERVERNAME\INSTANCENAME format) to an actual port number. Without it running, the ODBC connection will fail even if everything else is configured correctly.
Part 5: Create the Data Log Model in FactoryTalk View SE
Open FactoryTalk View Studio and open your application. In the Explorer panel, navigate to:
DataLog > Data Log Models
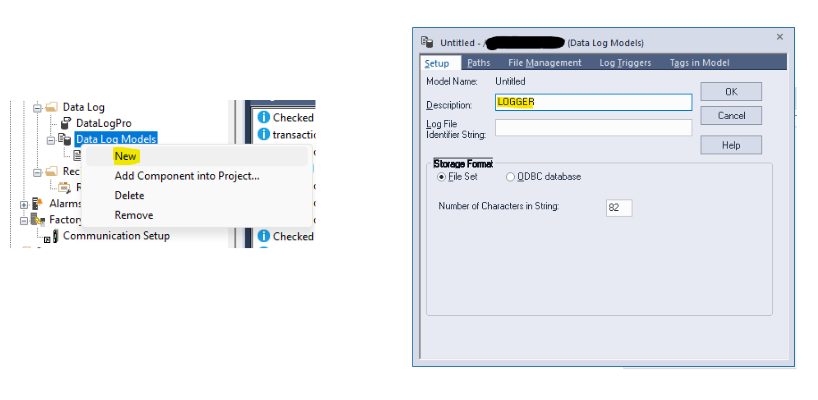
Right-click Data Log Models and select New.
This opens the Data Log Model configuration window. Name the model. In this guide it is called LOGGER.
5a: Configure the ODBC Data Source
In the Data Log Model window, locate the ODBC Data Source field and click the … button next to it.
- A prompt will appear asking for permission to run RSDlgODBC. Accept it.
- The Select Data Source dialog will open. Go to the System Data Source tab. Click New….
- Choose System Data Source (Applied to this machine only) and click Next.
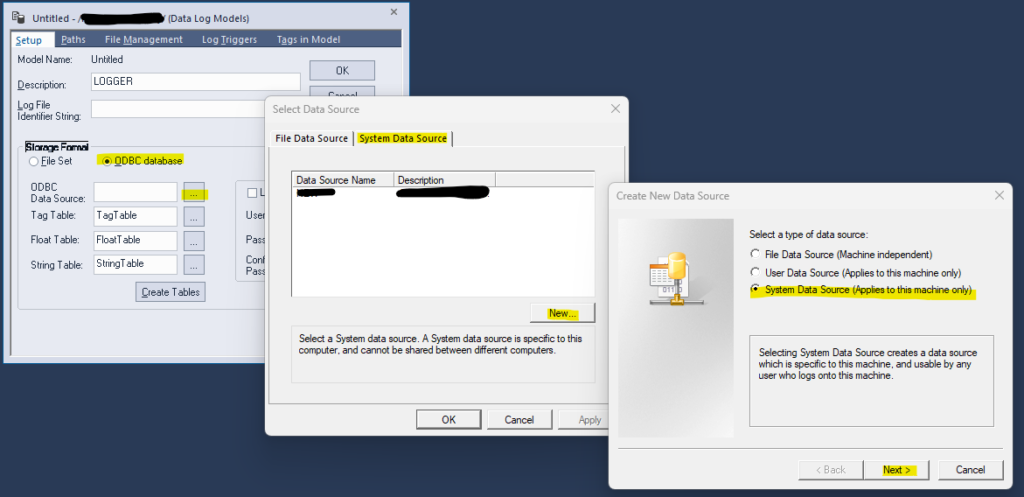
Why System and not User? FactoryTalk View SE runs logging as a background service. A User DSN is only visible to your personal Windows account. A System DSN is visible to all users and services on the machine, which is what the FactoryTalk service needs.
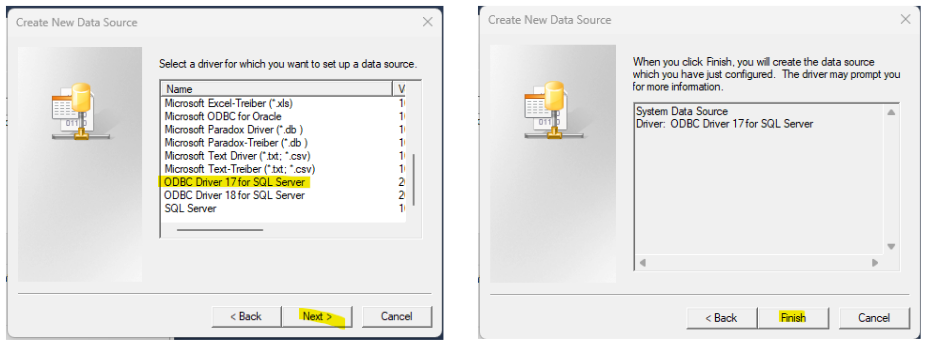
- From the driver list, select ODBC Driver 17 for SQL Server and click Next, then Finish.
5b: Create a New Data Source to SQL Server
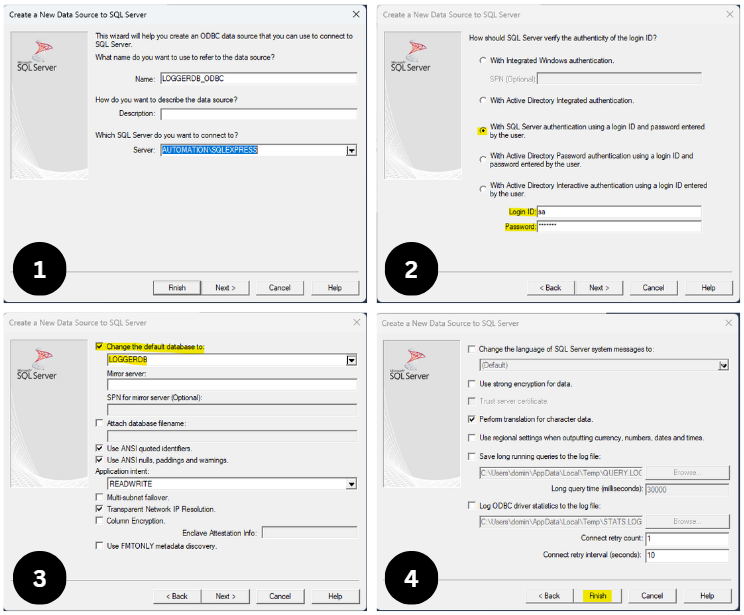
The Create a New Data Source to SQL Server wizard will open.
- Name: Enter a descriptive name for this data source (for example,
LOGGERDB_ODBC). - Description: Optional, but useful for documentation.
- Server: Enter the full instance name in
SERVERNAME\INSTANCENAMEformat. This must match the instance name from your SQL Server install. - Click Next.
- Select With SQL Server authentication using a Login ID and password entered by the user.
- Enter the credentials for a SQL Server administrator account. The
saaccount works here, or any account with sufficient privileges on LOGGERDB. Click Next. - Check Change the default database to: and select LOGGERDB from the dropdown.
- Click Next, then Finish.
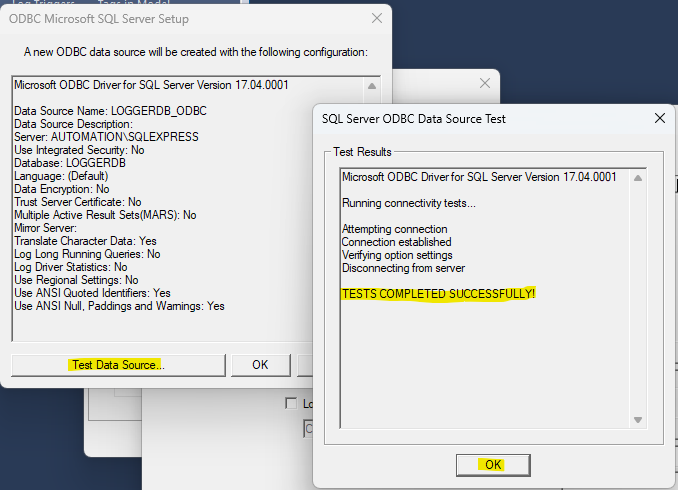
A summary screen will appear. You can click Test Data Source to verify connectivity, then click OK to close.
5c: Finish Configuring the Data Log Model
Back in the Data Log Model window:
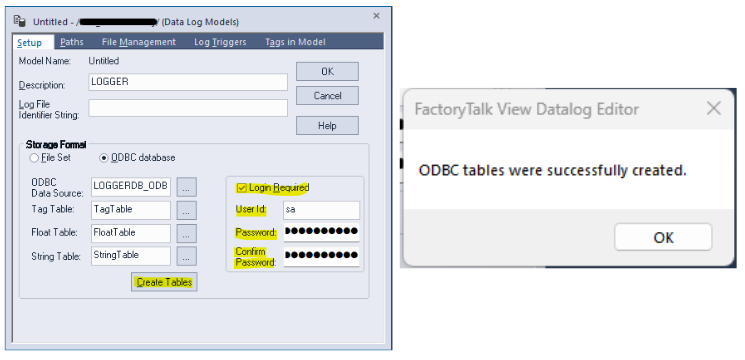
- Click Create Tables. This generates the required tables inside LOGGERDB automatically.
- Check the Login Required checkbox.
- Fill in the User ID, Password, and Confirm Password fields using the same SQL Server credentials entered during the ODBC setup.
5d: Configure Log Triggers
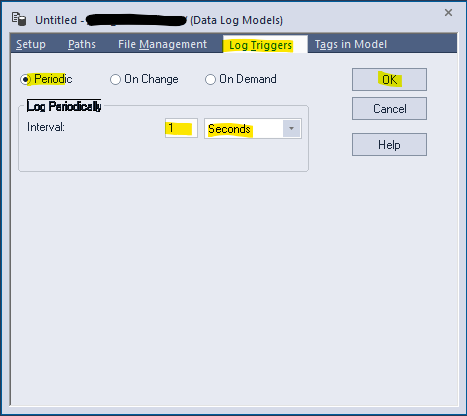
Go to the Log Triggers tab. Set the logging style based on your application’s requirements:
- On Change: Logs a record whenever a tag value changes.
- Periodic: Logs on a fixed time interval.
- On Demand: Only logs when explicitly triggered by a command.
Set the associated parameters for whichever style you choose.
5e: Add Tags to the Model
Go to the Tags In Model tab. Use the tag browser to select the PLC or HMI tags you want logged when the Data Log Model is active.
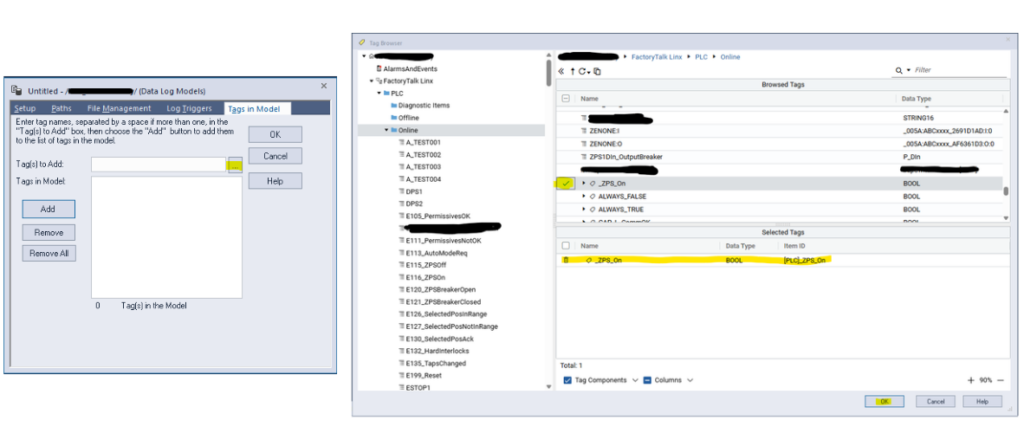
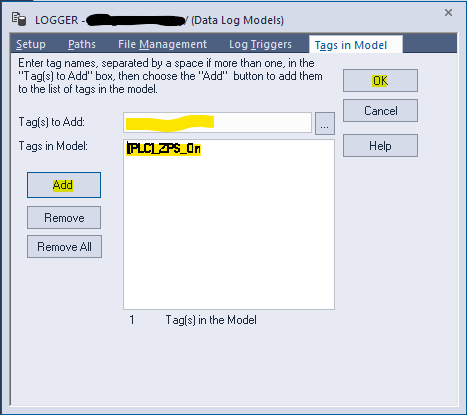
Click OK to save and close the Data Log Model. On the first save you will be prompted to choose the Component Name. In this case, I have named it LOGGER, which should now appear under Data Log Models in the Explorer.
Part 6: Start and Stop Logging with VBA Commands
To activate and deactivate the Data Log Model from a button or other triggering source in your FactoryTalk View SE display, use the following VBA commands:
Start logging:
DataLogOn LOGGERStop logging:
DataLogOff LOGGERReplace LOGGER with whatever name you gave your Data Log Model if it differs.
These commands can be placed on a button’s press event, a global connection, or any other VBA trigger in your application.
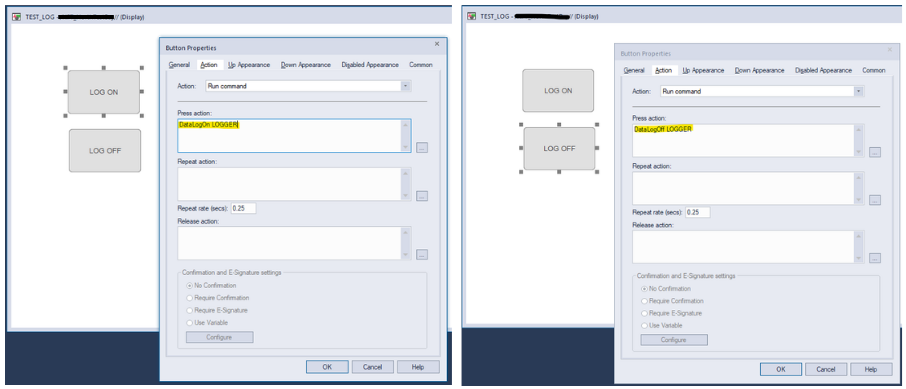
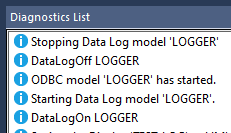
On successful setup, testing should yield the following in the Diagnostics List:
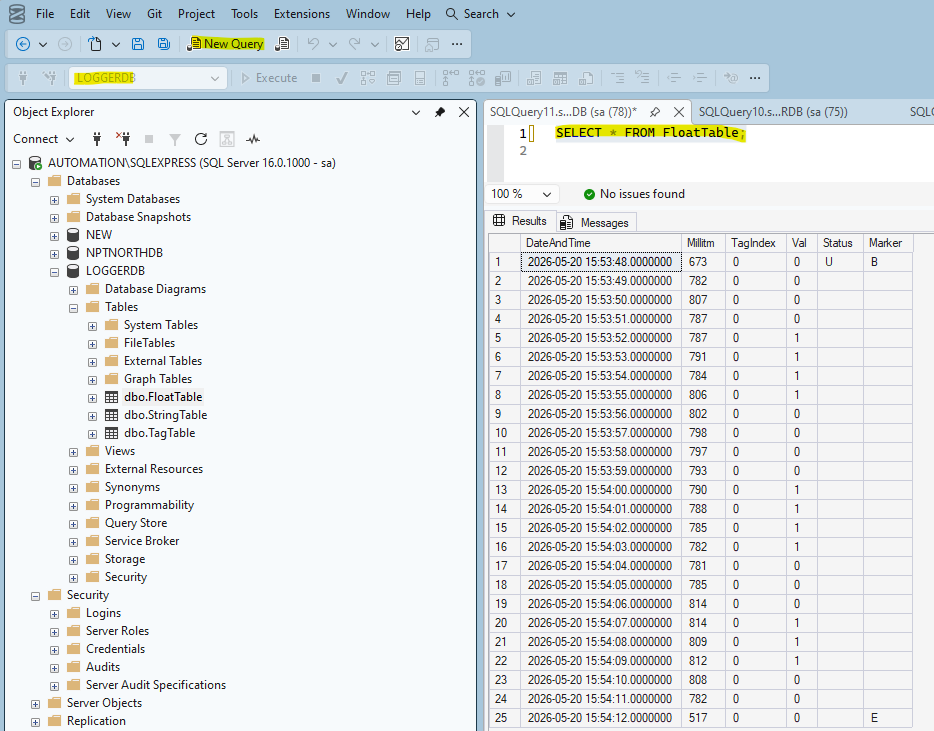
Additionally, you should see logged values in the Tables created by the Data Log Models dialog, which can be seen by running a SELECT statement in SSMS: